Watch video demonstrations of the drills
Password is: drills
https://vimeo.com/album/3896089
SOME DRILLS FOR MAXIMIZING THE EASE OF ROWING IN A NUTSHELL
By Gordon Hamilton
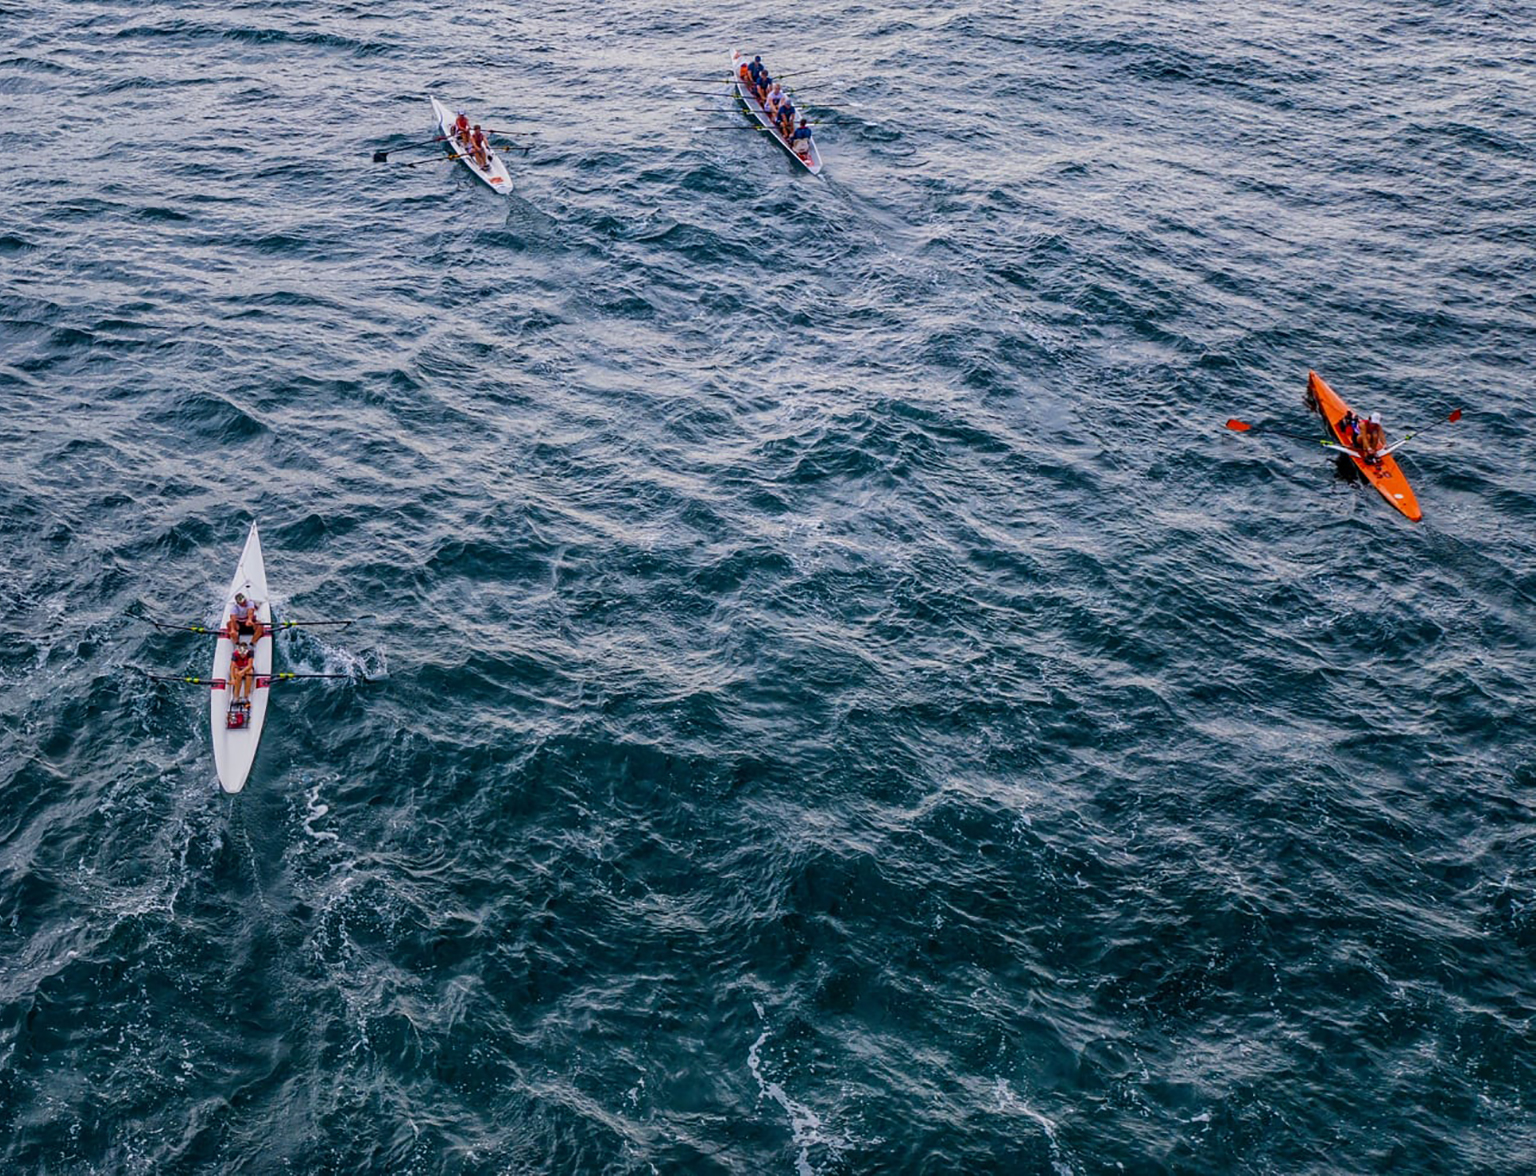
The best way to improve your rowing, to make these movements habits, is to do drills. Generally, do a drill for a certain period of time and then follow this by rowing easily trying to implement the lesson of the drill before moving on to another drill. Most drills should be followed by a time of easy rowing.
1. KING OF THE MOUNTAIN (PROGRESSION DRILL):
A) Square Release:
Sitting at the finish of the drive, legs flat, hands at center of gravity near the body with wrists flat, elbows out and level with the hands, shoulders down, core stable (you are The King of the Mountain), apply an exaggerated force against the pin toward the blade with your triceps, pecs, esp. elbows in an almost isometric exercise pushing toward the pins/blades. Keep a vertical orientation, i.e. your weight above the handles; begin tapping the blades half way out of the water using your entire forearms hinged at the elbows (your entire core). Hold your elbows steady. You should feel as though you were beginning to lift yourself out of a pool by pressing down on the pool deck. Once you have established stability and some rhythm, bring the blades all the way out. Again after you re-establish your stability and rhythm, make three more releases and then release and feather, being sure to come out of the water with blades squared. Do not use your wrists to extract the blade from the water. Keep your wrists flat and the extraction and the feathering separate events. Do this until stable and then proceed to…
B) Release, Feather, Hands Away:
While still maintaining your core stability (you are The King of the Mountain) and feeling as though you were lifting yourself out of the pool hinge the release from the stationary elbows using your forearms, etc. and begin to swing the hands away following this symmetrical pattern, keeping them as close to the same plane as possible: down parallel to your belly, then down towards your knees parallel to your thighs with the second knuckles of your trailing hand(see Release) brushing the base of the thumb of the leading hand and then once over the knees, spread them out parallel to the water. Do not move your body; remain stable in your lay-back position. Repeat until satisfied and stable. Your goal should be to be able to pause with the hands away with both blades off the water and your boat stable. This does not require that you be one of the rowing gods, only that you practice, over and over. Once you can pause with your blades off the water and feathered, you can progress into doing a Newton, Drill #3. The stroke and your stability begin at the release. It must be perfect.
2. PAUSE DRILLS:
These are extremely important for proper body preparation and learning how to keep constant and consistent pressure on the pins toward the blades and to move with the speed of the shell.
A) “Arms away”
After executing the correct release of the blade from the water, brace the trunk and legs and “release the frisbee” and then pause with the trunk still and the hands away and the legs flat. The arms should be extended but not rigid and the shoulders still “in the bow”. This should have been done without any movement whatsoever of the back and shoulders. When sculling, check that the hands are as close to the same plane as possible with the left or starboard ever so slightly above and ahead of the right. Make sure you have maintained firm contact with the pin. Check the pattern and be sure that the second knuckles of the following hand have brushed the base of the thumb of the leading hand. After a momentary pause, rotate the pelvis, relax the belly and continue the recovery and stroke until the next release. The path of the hands is parallel to the body, then parallel to the thighs, then, once the hands have passed over the knees, parallel to the water.
B) “Half slide pause”
Having executed the initial part of the recovery and established your body angle with your weight now resting gently on the foot stretcher, the seat, and the pin, pause your slide movement at half slide ( we can consider having the angle between the back of your thigh and your calf muscle at 45 degrees as half slide) your blade should be squared 30 degrees. Check hand/handle position and be sure to maintain your pressure on the pin. Keeping your head and chest up, after a momentary pause, continue on to the entry and the rest of the stroke until the next pause at half slide. Your upper body preparation and arm extension ( Reach) should be accomplished by the half slide pause. If sculling, your full length is accomplished in the time after the pause by continuing to separate the distance between the handles right up to and through the entry. If sweeping, the full length comes during the second half of the recovery by continuing to swivel the oar around the pin. Make a distinction between the first half of the recovery, when you are establishing your reach, and the second half, when you are moving yourself into the stern by applying pressure against the pin toward the blades (establishing your Length), which are behind your handles. Always feel as though it is the boat which is coming toward you! In the last 1/3rd of the recovery, the seat and oar handle should be moving together at the same speed, and maintaining the same distance.
C) Rock and Row:
Pause with hands away, on coxswain’s command or your own, “rock” rotate hips and establish your body angle. On “row” proceed up the slide into the entry and drive. This is a great drill for establishing rhythm in a team boat.
D) Standard Pause Progression:
Pause at the release for a series of strokes, then pause with hands away for number of strokes, then pause at 1/2 slide for a number of strokes; finish up with no pause.
3. “NEWTONS”
So named for Isaac Newton’s Third Law of Motion. The purpose of this drill is to increase the awareness of the movement of the shell and your effect upon this movement, especially during the recovery and entry.
Begin with the blades covered in the water at the release position. Tap the blades out and swing the body forward, feeling the effect of your body mass moving toward the stern setting the shell in motion in the opposite direction. Be sure that it is the pressure against the pin(s) out and back which is moving you into the stern, not your legs drawing the boat under you. Your legs should remain completely relaxed! (see Recovery)The entry should be executed without interrupting this movement, without any impulse upon the foot stretcher or force upon the blade as it enters the water. Make the entry by continuing to have the handles swivel around the pin and pushing the blade down. Allow the water to stop the blade. Every effort should be made to keep the shell and your body stable by maintaining constant and equal pressure on the oarlock and keeping your hands in the same relative position. Stabilize! Do not try to balance the boat. Once the blades have taken the water, return to the finish position by skimming the oars on the surface of the water.
4. “BLENDING THE DRIVE”
The purpose of this drill is to improve the efficiency of the drive and not waste energy trying to suddenly accelerate the boat as the arms join the legs and back.
Begin by rowing a number of strokes using just the legs without either the back or the arms joining in. Push off the ball joint of your big toe. Pause at the release. Next row a number of strokes adding the back right after the hips have engaged (when the heels have snapped down and you have a stable platform), pausing with the arms away. Finally add the arm draw around the final third of the drive, just as you begin to feel your weight start to settle on the seat. Pause at the release and let the boat decelerate. The focus of this drill is on the point of unification of the arms with the legs and back. This should be accomplished without jerking the arms. It should be smooth and fluid with every effort made to keep constant pressure on the pin and foot stretcher and therefore on the blade.
The next phase of the drill is to execute this motion without the pause. The shell will now be traveling much faster and the unification will be more difficult to accomplish smoothly. Work for this seamless blending and a feeling of constant pressure on the foot stretcher, pin and blade while holding your suspension right through until the release.
An interesting alternative to this is to do it on an ergometer, with or without using the handle. Just work on the smooth blend of the unification motion. If using the handle, keep your eyes on the chain as it comes off the sprocket and, keeping it in the upper third of the window; make sure that it travels in a direct linear path to the point just below your sternum at your center of gravity.
5. “FEET OUT”
The purpose of this drill is to increase your ability to keep constant pressure on your foot stretcher, pin and blade; and learn where the proper release point of the drive is. Remove your feet from the shoes or clogs and row. This drill gives you immediate feed back on how well you are keeping a constant pressure and smooth acceleration. You should strive to have your legs, back and arm draw finish at the same time. Any continuation of the stroke, either by back swing or arm draw after the legs are done will result in your body falling to the bow of the boat and your feet coming well off the foot stretcher. Because of your momentum toward the bow caused by the drive, your feet will naturally come slightly off the stretcher at the release. Every effort should be made to minimize this by releasing just as the legs and back finish. One’s stability at the release can be aided by exhaling and using the breath to lift your rib cage as it passes through your body. Some people have difficulty doing this drill because it hurts their back. Increasing your stability through proper breathing can help with this. When first beginning this drill, make the release when the hands are clearly further from your body than usual and the blade clearly “loaded” so that you have a clear reference of what stability means and your feet remaining on the foot stretcher. Then over a few strokes, increase your length through the arm draw at the end of the drive to the point of “tumbling”, when you will know you have gone too far. Then back off. Having your foot come off the foot stretcher about 1/2 inch is acceptable, beyond that is not.
6. “SWANS”
This drill should probably be done outside the shell. It’s purpose is to teach the correct method of rotating your pelvis when getting your body angle as you swing out of bow at the release. It can be done either standing or while seated. If standing, relax your knees (your hips do not rotate freely if your knees are locked), hold your arms straight out from your sides with your palms facing toward the front. Holding your head up and your spine straight, bend forward from your waist. Holding your arms out helps to keep your chest up and your spine straight, putting the emphasis on the rotation of the pelvis.
7. “TRUNCATING” (7 X 6):
This is another progression drill similar to the Blending. It is designed to teach the proper feeling of the blade coming out of the water at the correct time and the feeling of releasing from pressure. As with the Blending, it progresses from pauses to continuous strokes, thereby increasing the speed of the boat and the difficulty of the proper execution. It is excellent as a “team boat” drill. Begin by taking single strokes pausing with the hands away.; however, this is Not A NO ARMS DRILL! The hands should, therefore, not be near their normal finish position. But the draw should have begun. In other words, the drive is “truncated”. You should be releasing the blade when you are clearly still “suspended” with the hands, perhaps, some 6-8 inches from the body and using your mass to move the boat. Release the blade from the water just before your weight has settled on the seat. Releasing at this point (with the hands some 6-8 inches from your body), the blades will absolutely leap out of the water with surprising ease. After 5-10 of these strokes with a pause, bring the arms to full completion of the drive, releasing just as the leg drive is completed. Strive for the same feeling of the oars “leaping out”. Do this for 5-10 strokes with a pause; then do 5-10 strokes without the pause and work for the smooth blending of the draw and releasing at the proper point and feel of the oars coming out effortlessly. If this is being done in a team boat, have another oarsman or group join into the drill right after the second segment, when you have just gone to a full finish but are still working with a pause. Continue the progression. The end of the progression of this drill should have the entire boat rowing full strokes without a pause and the boat should be flying! 7 x 6 =
8. SUB 10:
The purpose of this drill is to increase your sensitivity to all aspects of the stroke cycle. The low rating makes it necessary to make every movement efficiently and precisely. There should be no pauses or jerks. The drill consists in rowing for a period of time at a sub 10 rating per minute. Everything should flow: release to recovery, to entry, to drive and power application.
9. SQUARE BLADES:
The purpose of this drill, rowing without feathering, is to emphasize the release of the blade without using your wrist to get the blade out of the water. The extraction should be made by depressing the back of the hand using your whole forearm hinged at the elbow while keeping the wrist flat (See Release). As this can be rather frustrating when you are first learning this skill, I suggest doing 5 strokes square, 5 feathered, alternating.
10. SKIMMING:
This drill is to help learn the process of propelling yourself into the stern while making the entry. Sit at 3/4 slide with your body angle and arm extension complete and ready for the last 1/4 of the slide into the entry with your blades feathered and resting on the surface of the water. From this point, by separating the handles (for sculling) or swiveling the handle around the pin (for sweep), push yourself by pushing the seat and your still, stable body toward the stern. Avoid pulling yourself up by your feet, rather, use the pressure on the pin as the handle swivels outward to propel yourself. Keep your sternum up! In a sweep boat, it is the inside arm which applies the pressure against the pin toward the blade.
(Were you actually to be making an entry in a sweep boat, the outside arm would make the placement by opening up the angle of your armpit.).
11. RUNNING DOWN HILL:
The purpose of this drill is to develop your skill at rowing at higher rates by becoming aware of at what rating your stroke falls apart. Begin by rowing at full pressure at slightly under your standard race pace; then begin to try to increase your rating every stroke, at first going up a beat per stroke and then 1/2 beat a stroke. Using your speed computer, continue to raise the rating until your speed no longer increases with the increase in rate. Then paddle, collect yourself and begin again.
12. ULTRA-WIDE GRIP (FOR SWEEP):
The purpose of this drill is to encourage you to continue rotating your trunk and swiveling the handle around the pin through the entry for length. Move your inside hand well down the loom and row long strokes. This drill is very good for helping you get the idea of “pushing” or placing the blade into the water with the outside hand while you swivel around the pin using your inside arm which is pushing against the pin toward the blade. Feel how the process of swiveling while pushing against the pin toward the blade propels you into the stern. An alternative to this is to use an under-grip with the outside arm to emphasize the use of the lats rather than the shoulder or arm muscles to hang your weight. This drill also encourages you to feel the load on the outside arm. Observe where your hands are at the entry. This is an excellent drill for increasing your length at the front (entry) end. When you return to your regular grip, there is no reason why you should not be able to replicate this length. It is frequently having a rigid inside arm which prevents you from swiveling as far around the pin as you are capable of.
13. PADDLE LIGHT:
“That means to row each stroke absolutely true but with as little work as possible. This is the hardest exercise to do correctly, and the most beneficial. Each man should try to come forward with perfect ease at absolute rest. Also he should try to hold the oar balanced evenly on the rowlock and held on the feather till right forward…..Let him feel that he springs off the stretcher very lightly but with a true spring with the whole weight; and let him feel that he is drawing with elastic arms at the oar, so as to draw the oar gently but continuously against the rowing pin, and to draw the blade similarly through the water, right to the finish; and then, with a slightly harder pull at the finish, let him whip the oar round the turn. It should all be done with the utmost care. The oarsman should come forward at rest and rock himself on to the stretcher as if he was rocking a baby to sleep, and all through the stroke he should move as if he was nursing a baby to sleep. Thus he will improve his touch rapidly, and that is everything. Perfect the “Paddle Light” and you perfect your rowing, but it will take a lot of hard trying”
The Complete Steve Fairbairn On Rowing, P. 427
14. FRONT END:
Begin at 3/4 slide. Using the pressure against the pins toward the blade by separating your hands propel yourself into the stern. Burry the blade while still swiveling (for sweep) or while still separating the hands (for sculling) and drive the first 1/4th of the drive, and release the water and pause. There are a number of points to keep in mind here: keep the horizon flat as you burry the blade and begin the drive, don’t let your head or chest drop. Keep your legs relaxed during the last part of the recovery through the entry. You want to expand your chest as you make the entry. The distance between your hands and the seat should not change, whether you are swiveling or separating, through the entire movement from 3/4 of the recovery, through entry and the first 1/4th of the drive! Every effort should be made to maintain this distance between the seat and handle. The movement into the stern should be accomplished by using the pressure against the pin (whether sweeping or sculling) to propel you forward through the entry. Do not use your feet to draw yourself forward. Use the pressure against the pin! (see Half-slide pause drill, #1B and Skimming, #10) Once the blade is in the water think of moving the Boat, not the blade. This can be done as a progression drill, going from a number of strokes with a pause (hands away at release), then, perhaps, add another pair of rowers, with a pause for
a few strokes, then continue without a pause for a number and finally, row the stroke out with full length drives. These final strokes should be close to perfect. The purpose of this drill is to feel the effect of the water on the blade, the loaded and anchored blade, immediately and to begin to move the boat immediately. It is not about bringing the handles anywhere. The boat should feel heavy and MOVE!
15. HALF BURIED BLADES:
Attempting to row with your blades half buried has a couple very important effects. First, I have observed that most people go too deep with their blades during the entry and drive. Watch, look at, your blade from the entry through to the release and try to have it only half buried. Few can do this at first. You will discover that your blade is, at best, at its proper depth. Observe how little you had to lift your hands (open the angle of your armpits) to make the entry, how little effort this requires.
Once you have learned the proper blade depth (only the blade should be in the water with almost no shaft or loom) you can then begin to try to actually only bury the blade half way. This exercise will help you develop your skill of working with the water. If you are too impatient, you will tear the blade through the water. This requires developing a feel for the speed of the boat and working with it.
16. JOY OF BACKING:
Sit at the finish with your legs flat and blades squared. Back by pushing your hands away and let them lead yourself up the slide with relaxed legs and soft hands. As you approach the front end, feel the water pull the blades toward the bow and the handles into your finger tips, them push your legs as for the first 1/4 of a “drive”. Repeat. We are after the feeling of the water accepting your blades (the water “catching” your blades) and the stable, secure feel of the blades locked into the water. This gives the idea of how the drive develops without ripping the handles toward us by working with the water with soft hands and relaxed legs. Tension in either will give you a very unstable feeling.